
Warning: Undefined array key 2 in /home/c3240596/public_html/z0n0.com/wp-content/plugins/firsth3tagadsense/firsth3tagadsense.php on line 256
Warning: Undefined array key 2 in /home/c3240596/public_html/z0n0.com/wp-content/plugins/firsth3tagadsense/firsth3tagadsense.php on line 256
Warning: Undefined array key 3 in /home/c3240596/public_html/z0n0.com/wp-content/plugins/firsth3tagadsense/firsth3tagadsense.php on line 257
Warning: Undefined array key 3 in /home/c3240596/public_html/z0n0.com/wp-content/plugins/firsth3tagadsense/firsth3tagadsense.php on line 257
Warning: Undefined array key 4 in /home/c3240596/public_html/z0n0.com/wp-content/plugins/firsth3tagadsense/firsth3tagadsense.php on line 258
Warning: Undefined array key 4 in /home/c3240596/public_html/z0n0.com/wp-content/plugins/firsth3tagadsense/firsth3tagadsense.php on line 258
当ブログ「ぞのドットコム」に、雪を降らせている”ぞの(@z02n05)”です。
いつの日からか降っていたことは、お気付きでしたか?
季節感があっていいかな思いつつ、より寒さを感じてしまうような気もしています。
どうやって雪を降らせる設定しているのかと、WordPressの管理画面から行えます。Jetpackのプラグインを入れていたら。
1分もあればできる設定ですので、気になった方は、試してみてください。
それでは、やり方を紹介しますね。
WordPressのブログに雪を降らせる方法
まずは、記事を投稿したり、外観をカスタマイズしたりするときなどと同様に、WordPressの管理画面に入ります。
そして、「Jetpack」という超有名なプラグインをインストールします。
WordPressでブログをやっている人は、もうすでに導入されている方も多いのではないでしょうか。
次に、「設定」の中の「一般」をクリックです。サイドバーのどこかにいますので、見つけ出してください。
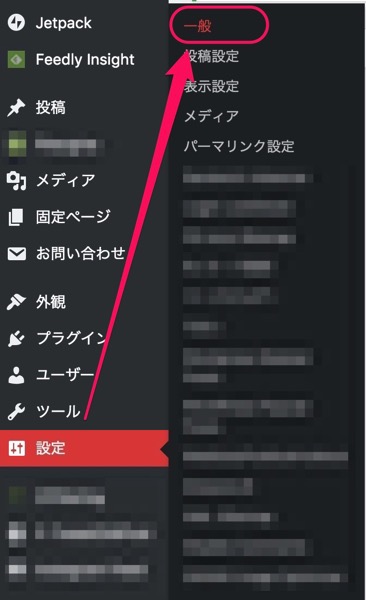
そしたら、「一般」の中の、最下部まで画面をスクロール。
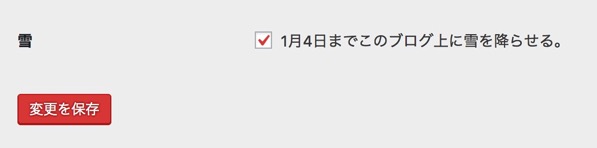
すると、“雪「1月4日までこのブログ上に雪を降らせる。」”という項目があるので、チェックをして「変更を保存」です。
以上で、設定は完了です。
ご自身のブログの様子を見てみてください。どうですか?雪を降らすことに成功しましたか?